


How to Build a Texture Revision Protocol for Post-Acne Skin
Ashley Ford, a licensed esthetician, built a progressive protocol for this client — and after just two sessions spaced 4 weeks apart, the scar relief looks noticeably softer and the texture smoother.
A client with post-acne scarring is a familiar case for almost every treatment room. Rolling and boxcar scars across the cheeks, uneven texture, enlarged pores.


Meet the Esthetician
Behind the Protocol
Behind the Protocol
"My goal has always been simple: help clients feel confident in their skin."
Ashley Ford is a licensed esthetician and owner based in Wilmington, North Carolina. Her work focuses on acne care, brow artistry, and holistic skin support.
Rolling scars form shallow depressions due to structural changes in the dermis and fibrous bands, while boxcar scars have more defined edges. This client presented with both types. That set the primary focus of the protocol: working with skin texture and surface relief.
Fitzpatrick type: II–III, moderate sensitivity
Main concern: Moderate post-acne scarring, primarily rolling scars and shallow boxcar scars, localized on the cheek area
Duration of condition: 15+ years
Visible signs: uneven texture, enlarged pores, dullness
Sessions completed: 2
Interval: every 4 weeks
Protocol goal: support the look of smoother texture, a less pronounced scar relief, and a more even tone
Main concern: Moderate post-acne scarring, primarily rolling scars and shallow boxcar scars, localized on the cheek area
Duration of condition: 15+ years
Visible signs: uneven texture, enlarged pores, dullness
Sessions completed: 2
Interval: every 4 weeks
Protocol goal: support the look of smoother texture, a less pronounced scar relief, and a more even tone
Moderate sensitivity
With a Fitzpatrick II–III phototype and a tendency toward sensitivity, the protocol called for a gradual increase in intensity rather than an aggressive start at the very first session. The first session became the baseline for the depth progression that followed.
Uneven light reflection
Depressions, scar-related changes, and enlarged pores disrupt the even reflection of light, which can make the skin look less smooth, dull, or tired. The more even the surface, the more uniformly it reflects light — and the more visible the result of each following session becomes.
Uneven surface relief
Skin Concerns & Treatment Goals
What the Skin Was Showing


Step 3. Microneedling
Step 2. HydroDiamond Treatment
Protocol Logic:
How Each Step Built the Result
How Each Step Built the Result
Step 1. Double Cleanse


What was done: immediately after microneedling — Circadia Myo-Cyte Plus Anti-Wrinkle Serum.
Why: the surface is already cleansed and evened out — the serum spreads uniformly across the entire treatment area.
What happened in the skin: the serum supports the appearance of denser, smoother-looking skin, complementing the work on texture.
Why: the surface is already cleansed and evened out — the serum spreads uniformly across the entire treatment area.
What happened in the skin: the serum supports the appearance of denser, smoother-looking skin, complementing the work on texture.
Step 4. Serum Infusion

Why: to stimulate skin remodeling and purposefully work on the uneven relief of the scars.
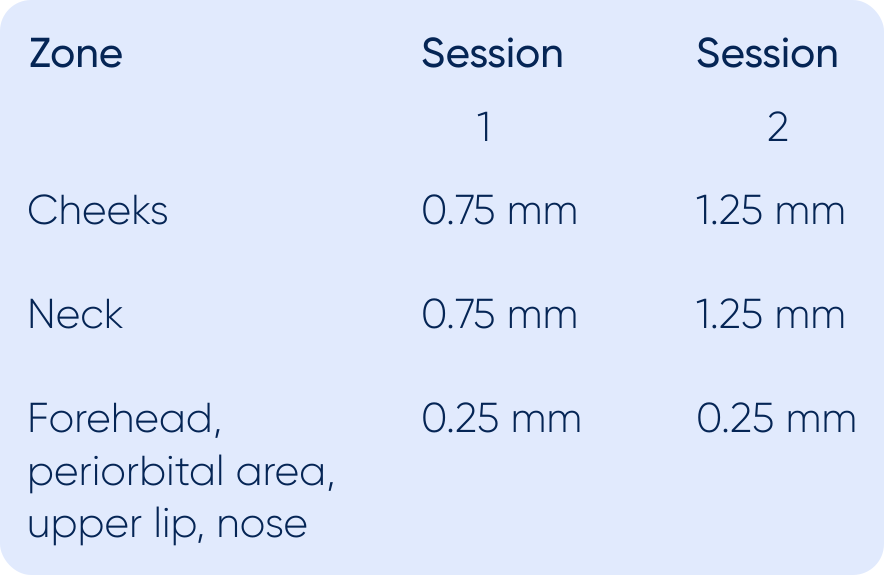
What happened in the skin: the XCellarisPRO Twist uses the patented Active Retrieval Mechanism, which controls needle insertion and retraction with high mechanical precision. In practice, this means the set depth is held consistently throughout the entire procedure — which is exactly what allows the provider to work confidently at different depths in different zones within a single session, and to precisely reproduce or adjust the parameters at the next one.
What happened in the skin: the XCellarisPRO Twist uses the patented Active Retrieval Mechanism, which controls needle insertion and retraction with high mechanical precision. In practice, this means the set depth is held consistently throughout the entire procedure — which is exactly what allows the provider to work confidently at different depths in different zones within a single session, and to precisely reproduce or adjust the parameters at the next one.
What was done: microneedling with the XCellarisPRO Twist, performed without numbing, with the depth increased between sessions.
What was done: the treatment was performed using the HydroDiamond® modality on the Zemits Verstand HD with Serum with Glycolic Acid — Zemits LuminOxy PRO.
Why: before microneedling, the surface needed to be as even as possible.
What happened in the skin: the diamond tip removes the layer of dead cells, while the vacuum clears softened sebum and remaining debris from the pores. Micro-roughness of the stratum corneum is reduced — and the skin becomes more predictable to work on with the needle.
At the same time, LuminOxy PRO works across the skin: Glycolic Acid supports surface renewal; Hyaluronic Acid holds water in the upper layers, supporting a plumper look during exfoliation; Peptides support the appearance of firmer, more even-looking skin.
Why: before microneedling, the surface needed to be as even as possible.
What happened in the skin: the diamond tip removes the layer of dead cells, while the vacuum clears softened sebum and remaining debris from the pores. Micro-roughness of the stratum corneum is reduced — and the skin becomes more predictable to work on with the needle.
At the same time, LuminOxy PRO works across the skin: Glycolic Acid supports surface renewal; Hyaluronic Acid holds water in the upper layers, supporting a plumper look during exfoliation; Peptides support the appearance of firmer, more even-looking skin.
What was done: GlyMed Plus Vitamin C Cleanser, followed by GlyMed Plus Glycolic Cleanser (10%).
Why: to remove sebum, SPF residue, makeup, and other surface impurities from the skin.
What happened in the skin: the cleansers gently soften the surface buildup of dead cells in the stratum corneum. The skin becomes cleaner and better prepared, helping the next steps of the protocol work more evenly.
Why: to remove sebum, SPF residue, makeup, and other surface impurities from the skin.
What happened in the skin: the cleansers gently soften the surface buildup of dead cells in the stratum corneum. The skin becomes cleaner and better prepared, helping the next steps of the protocol work more evenly.
Step 6. OxyDome + LED
What was done: the client rests under the OxyDome on the Zemits OxiVelour PRO combined with the Zemits VivaLumix, red light, 10–15 minutes.
Why: to gently complete the protocol by pairing an oxygen-rich environment with LED as a comfortable finishing phase.
What happened in the skin: the OxyDome creates a localized oxygen-rich environment: high-purity oxygen is delivered through three separate inlets and circulates inside the transparent dome. At the same time, the LED works through the logic of photobiomodulation — red light at 630 nm interacts with light-sensitive structures in the epidermis, supporting a calmer, more even-looking tone.
Why: to gently complete the protocol by pairing an oxygen-rich environment with LED as a comfortable finishing phase.
What happened in the skin: the OxyDome creates a localized oxygen-rich environment: high-purity oxygen is delivered through three separate inlets and circulates inside the transparent dome. At the same time, the LED works through the logic of photobiomodulation — red light at 630 nm interacts with light-sensitive structures in the epidermis, supporting a calmer, more even-looking tone.
Step 5. CICA Sheet Mask
What was done: a CICA sheet mask applied immediately after the infusion.
Why: after needle work, the skin needs a transition from the active phase to the comfort phase — and the mask becomes that bridge while the skin is still highly receptive to soothing formulas.
What happened in the skin: centella soothes the skin and supports barrier comfort. The moist sheet base acts as an occlusive environment, helping reduce the feeling of tightness and supporting a calmer-looking skin appearance right after the procedure.
Why: after needle work, the skin needs a transition from the active phase to the comfort phase — and the mask becomes that bridge while the skin is still highly receptive to soothing formulas.
What happened in the skin: centella soothes the skin and supports barrier comfort. The moist sheet base acts as an occlusive environment, helping reduce the feeling of tightness and supporting a calmer-looking skin appearance right after the procedure.

Step 7. Barrier Finish
What was done: a barrier-repair moisturizer + broad-spectrum SPF.
What happened in the skin: the finishing products form a supportive layer over the stratum corneum, reducing moisture loss. SPF supports a more even-looking tone between sessions — which directly affects how clearly the result reads at the next visit.
What happened in the skin: the finishing products form a supportive layer over the stratum corneum, reducing moisture loss. SPF supports a more even-looking tone between sessions — which directly affects how clearly the result reads at the next visit.


Visible Result After 2 Sessions
Protocol Synergy:
Why It Delivered a Result
Why It Delivered a Result
- Noticeable softening of the appearance of post-acne scarring.
- Improved skin texture and smoothness.
- Improved overall clarity, freshness, and radiance of the skin.
Client Feedback
- Reports noticeably smoother and softer skin.
- Visible improvement after the second session.
- Minimal downtime and quick skin recovery.
- Increased confidence in the natural look of her skin.
- A positive overall treatment experience.
Note: needle depth, the number of steps, and the sequence of the protocol are always selected individually — according to the skin's condition, the treatment zone, and each client's tolerance of the procedure. The parameters shown here reflect the provider's decisions in this specific case and are not a universal recommendation.
The effectiveness of the protocol came down to the right sequence of steps. The skin was prepared for microneedling, which made it possible to work on a more even, controlled surface. The serum was then applied to skin that was already prepared, and the finishing steps were focused on comfort and calming.
The gradual increase in depth made it possible to adapt the intensity to the skin's response from session to session.
The gradual increase in depth made it possible to adapt the intensity to the skin's response from session to session.
Explore the Technology Behind This Protocol